The slides used in the video are shown below:
Slide 1

Welcome to the training course on IBM Scalable Architecture for Financial Reporting, or SAFR. This is Module 7, “Column Formulas.”
Slide 2

This module provides you with an overview of SAFR column formulas. Upon completion of this module, you should be able to:
- Explain the difference between column assignment and record selection
- Set column attributes and assign simple constant values
- Use if-then-else logic in setting column values
- Create column formulas
Slide 3

In contrast to record filtering, SAFR provides column assignment logic and column calculations, which also use SAFR logic text. Column logic is used to populate output columns with field values, constants, or calculations.
In the top example, record filtering excluded all customers with orders prior to January 2000. In the bottom example, columns are populated based upon customer type, either retail or commercial. Note that no value is assigned for the third record because this record refers to a government customer.
Slide 4

Remember that a constant can be applied to a column by clicking in the View Source cell and then selecting the Column Source Type constant in the Column Source Properties pane.
Slide 5

An alphanumeric value is entered “as is.” It is not included in single or double quotation marks. If spaces are assigned to the column, they will not be visible in this cell. Later you’ll see a better way of assigning a space to a column.
Slide 6

An alternative approach to assigning values to a column is to use a column formula. To enter a formula, select Formula in the Column Source Type field. Then double-click anywhere in the Column Source Value cell to display the icon, and click the icon.
Slide 7

The Logic Text Editor includes the Logic Text Helper, which enables you to place keywords, field names, and column numbers into logic for column assignment. These functions are similar to functions provided by record filtering.
Slide 8

A very simple “column equals” statement can be used to assign a constant value to a column. In this example, a constant value of a space is assigned to a column. Constants surrounded with double quotation marks create alphanumeric constants.
Slide 9

Field values and constants assigned in logic text must fit within the column output attributes that will be used to define the output. In this example, the value of ORDER_TOTAL_AMOUNT is written as a 4-byte binary field in the output file.
Slide 10

Column logic can include if-then-else logic as well. The column output will contain the result of the THEN or the ELSE conditions. Nested IFs are also permitted.
In this example, the value of ORDER_TOTAL_AMOUNT or the constant of 0 is written to the output file.
Slide 11

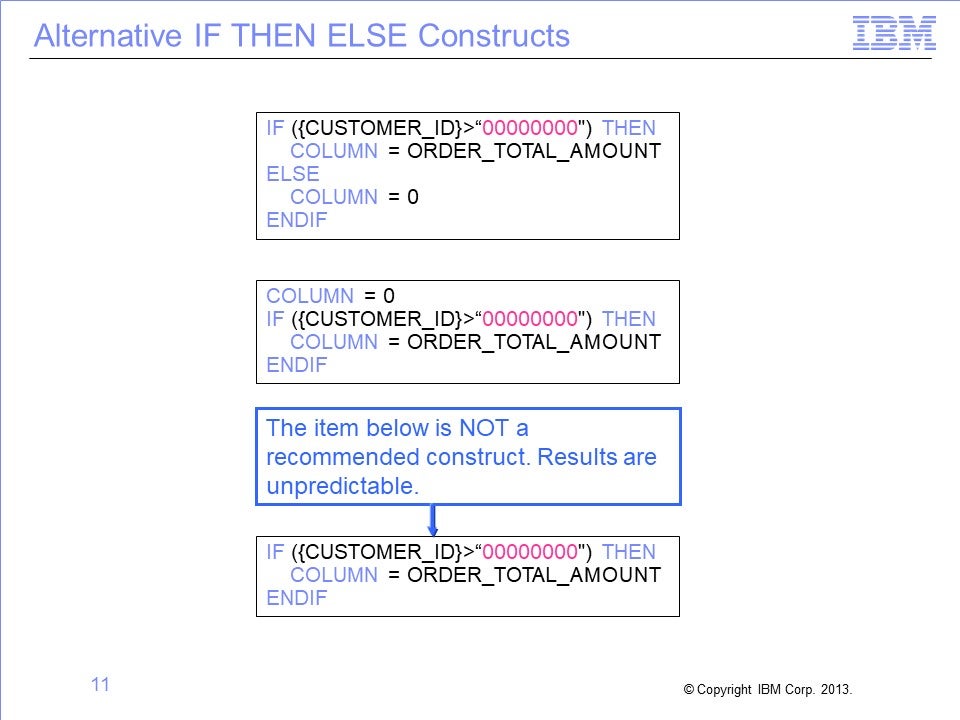
If then else logic can be written several ways. In addition to the typical IF THEN ELSE, a value can be assigned to a column and then a test can be performed to see whether that value should be overwritten.
All three logic statements seem to result in the same output. However, the third statement, without an implicit ELSE condition, is not recommended and may have unpredictable results. The second statement is also less efficient because the assignment is overwritten when the IF condition is true.
Slide 12

In addition to using field names in logic text, you can use functions. This column uses the ISSPACES function, which tests a field value equal to spaces. If true, the output column contains the text “***Error***”; if not true, it contains the store ID.
Slide 13

Column logic can be used to assign values to a prior column, which is called reassignment. Column logic is applied to columns starting from the left and moving to the right. Thus columns are populated left to right within SAFR, and previously assigned values can be overwritten by later columns.
Slide 14

Within the logic text, COLUMN= assigns a value to the current column, and COL.nn= refers to a prior column, where nn is the column number. Because columns are populated left to right, only prior columns can be referenced within column formulas. This feature does not require the same logic to be repeated in multiple columns; all columns depending upon the logic statement can be assigned within one column.
In this example, the logic within column 6 assigns, first, a space to column 6, second, the value XYZ to column 4, and third, asterisks to column 5.
Slide 15

Column logic allows calculations to be performed against numeric fields. Any calculation referencing a field name is performed at extract time because the Extract phase has visibility into all fields on the input LR.
Slide 16

Format phase column formulas are accessed by double-clicking anywhere in the Format-Phase Calculation cell to display the icon, and then clicking the icon.
Slide 17

Format calculations can be performed only on records that have made it through record selection, via the Extract phase. Format phase calculations refer to columns rather than field numbers. The only columns available for calculations are columns that are numeric, perform aggregation, or are the results of calculations.
In this example, column 4 is populated with the results of column 3 divided by column 2.
Slide 18

The following slides show the interaction of all four types of record and column filtering in the order they are applied by the Performance Engine.
The order is:
- Extract phase record filtering
- Extract phase column filtering and assignment
- Format phase column calculations, and
- Format phase output record filtering
Slide 19

The Extract phase performs input record filtering, determining which records should be selected for processing. In this example, record number 4 is not selected for further processing because its date is less than January 2000.
These examples of selected records are used on the next slide to illustrate column assignment.
Slide 20

Column assignment is performed on each record that passes record level filtering. It assigns specific values to the columns.
In this example, a zero is assigned to columns where the true condition failed on the first and third rows. The third column assigns similar logic based upon commercial customers, whereas the first column is assigned a 1 on every row.
These examples of extracted columns are used on the next slide to illustrate column calculations.
Slide 21

The Format phase performs column calculations using column values assigned in the Extract process, and then performs record filtering, based upon the final records.
In this example, column 4 is added to the output in the Format phase, based upon the column calculation. Because column 4 subtracts the value in either column 2 or column 3, it ends up being a count of non-retail, non-commercial customers.
These examples of calculated columns are used on the next slide to illustrate Format phase output filtering.
Slide 22

The Format phase performs record filtering as the last step before writing to the output file. It works against aggregated records if the view summarizes records. Otherwise it works against detailed records, as in this example.
In this example, the filter tests column 4 selects only non-zero records.
In conclusion, because of the combination of record filtering, column assignment, column calculation logic, and this final output record filter, the output file ends up being an extract of all non-retail, non-commercial customers.
Slide 23

This module provided an overview of SAFR column formulas. Now that you have completed this module, you should be able to:
- Explain the difference between column assignment and record selection
- Set column attributes and assign simple constant values
- Use if-then-else logic in setting column values
- Create column formulas
Slide 24

Additional information about SAFR is available at the web addresses shown here.
Slide 25

Slide 26

This concludes the Module 7. Thank you for your participation.